Description
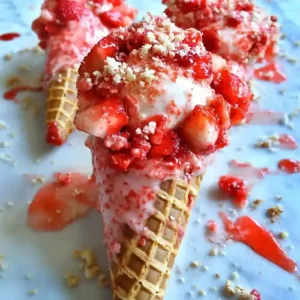
Delicious no-bake Strawberry Crunch Cheesecake Cones with a creamy filling and crunchy topping.
Ingredients
Scale
- 6 waffle cones
- 8 oz (225 g) full-fat cream cheese, softened
- 1/2 cup (100 g) fine granulated sugar
- 1 cup (240 ml) heavy cream, cold, for whipping
- 1 teaspoon (5 ml) pure vanilla extract
- 1 cup (100 g) finely crushed graham cracker crumbs
- 4 tablespoons (56 g) unsalted butter, melted slightly
- Fresh strawberries, diced (amount as desired for layering)
- Red food coloring, a drop (optional, for enhancing color)
- White chocolate (amount per package directions for melting and dipping)
- Strawberry glaze (prepared according to linked recipe)
- Strawberry crunch topping (prepared according to linked recipe)
Instructions
- Step 1: Prepare the Glaze: Make your strawberry glaze following the provided recipe. This will add fresh flavor and moisture to the cones, preventing dryness.

- Step 2: Create the Crunch Topping: Prepare the strawberry crunch topping as instructed in the linked recipe. This provides the necessary texture contrast and sweetness.
- Step 3: Melt the Chocolate: Melt the white chocolate according to the package directions. Use low heat and monitor carefully to avoid burning and maintain smoothness. If chocolate hardens too quickly, remelt in 10-second microwave increments until fully melted and smooth.
- Step 4: Dip the Cones: Dip the top portion of each waffle cone into the melted white chocolate. Gently tap off any excess chocolate to avoid mess and ensure neat coating.
- Step 5: Coat with Crunch Topping: Immediately roll the chocolate-coated cone in the strawberry crunch topping until evenly covered. Uniform coating improves appearance and flavor consistency.
- Step 6: Set the Cones: Place the dipped and coated cones on a parchment-lined baking sheet. Allow the chocolate to harden, which generally takes about 10 minutes. Keep cones upright and avoid stacking to prevent sticking.
- Step 7: Prepare the Filling: Scoop your no-bake cheesecake filling into a piping bag or a Ziploc bag with the corner snipped for easier and cleaner filling of the cones.
- Step 8: Layer the Filling: Fill each cone halfway with cheesecake filling. Add a small spoonful of strawberry glaze and a few pieces of diced fresh strawberries on top to build flavor layers and texture contrasts.
- Step 9: Complete the Filling: Fill the remainder of each cone with cheesecake filling, repeating the glaze and strawberry layer. Avoid overfilling to prevent overflow and mess.
- Step 10: Top with Crunch: Sprinkle additional strawberry crunch topping on the filled cones’ tops for decoration and texture.
- Step 11: Drizzle with Chocolate: Using any leftover melted white chocolate, drizzle lightly over the cone tops and add extra strawberry crunch topping to enhance appearance and flavor. Avoid heavy drizzle to prevent overpowering.
- Step 12: Serve or Chill: Serve immediately or refrigerate in an airtight container until ready to serve. Cones are best fresh but can be stored up to 3 days in the fridge to retain crunchiness.

Notes
- Room Temperature: Store cones upright in an airtight container at room temperature up to 1 day. Avoid warm places to prevent melting or sogginess.
- Refrigeration: Store in an airtight container upright in the refrigerator for up to 3 days to keep freshness and crunch.
- Freezing: Wrap cones individually in plastic wrap and place in a freezer-safe container. Freeze up to 1 month. Thaw in the refrigerator before serving.
- If cones become soggy, fill them shortly before serving to maintain texture.
- When white chocolate hardens too quickly during dipping, remelt in short microwave bursts of 10 seconds until smooth.
- If the cheesecake filling is too thick, add milk one tablespoon at a time to achieve desired consistency.
- Use a piping bag for filling cones to reduce mess and improve presentation.
- Press strawberry crunch topping gently onto cones if toppings dislodge before serving.
- Serve with fresh fruit salad or a simple green salad as a fresh contrast.
- Pair with vanilla ice cream or whipped cream for added richness.
- Use leftovers of strawberry glaze, crunch topping, or melted chocolate to top ice cream sundaes, fruit parfaits, cakes, or pancakes.
Nutrition
- Calories: Not provided
- Sugar: Not provided
- Sodium: Not provided
- Fat: Not provided
- Saturated Fat: Not provided
- Unsaturated Fat: Not provided
- Trans Fat: Not provided
- Carbohydrates: Not provided
- Fiber: Not provided
- Protein: Not provided
- Cholesterol: Not provided