
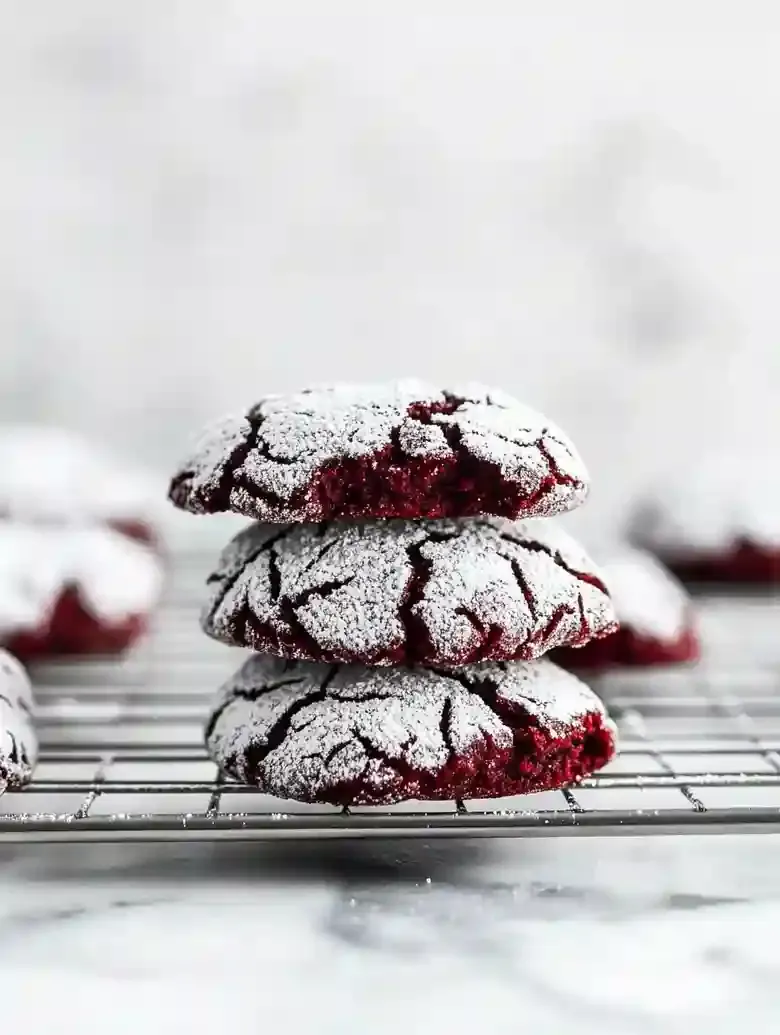
These red velvet cookies have a soft, chewy texture and are topped with a sweet layer of powdered sugar, making them a festive treat for any occasion, especially Valentine’s Day!
This recipe addresses the challenges of achieving the right texture and vibrant color often lacking in traditional red velvet cookies.

I remember one Valentine’s Day when I wanted to impress my friends with a special sweet. I thought these cookies would be easy enough to whip up, yet I found myself struggling with the dough’s thickness and not achieving that beautiful crinkle. With some practice and a few tweaks, I’ve nailed down a reliable recipe that always delivers that eye-catching crackle.
This recipe comes together in just 10 minutes of prep time, followed by a quick bake of 10 minutes. The result? Cookies that are both fudgy and invitingly warm, just right for a cozy treat. If you want to try something extra special alongside these cookies, I recommend checking out my Strawberry Crunch Cheesecake for a perfect pairing!
Table of contents
Why You Will Love This Recipe
- Rich Flavor Profile The use of cocoa powder and butter gives these red velvet cookies a satisfying chocolaty taste that pairs beautifully with the sweetness of the sugars. A hint of vanilla extract enhances the overall flavor, making every bite a delightful treat.
- Unique Texture These cookies have a wonderfully chewy center with a slightly crinkled exterior, thanks to the combination of granulated sugar and powdered sugar coating. This creates a satisfying contrast that adds to the cookie’s appeal.
- Quick and Easy Preparation In just 20 minutes, you can whip up a batch of these cookies from start to finish! The straightforward steps make them accessible for both new and seasoned bakers, perfect for a quick treat.
- Make Ahead Convenience You can prepare the dough in advance and chill it for later baking. This makes it easy to have freshly baked cookies on hand for any occasions or last-minute cravings.

Red Velvet Crinkle Cookies
- Prep Time: 10 minutes
- Cool Time:
- Cook Time: 10 minutes
- Total Time: 20 minutes
- Yield: 24 cookies 1x
- Category: dessert
- Method: Baking
- Diet: Vegetarian
Description
Deliciously soft and chewy red velvet crinkle cookies with a sweet powdered sugar coating.
Ingredients
- 1/2 cup (113 g) unsalted butter
- 3/4 cup (150 g) light brown sugar
- 1/2 cup (100 g) granulated sugar
- 2 large eggs
- 2 teaspoons vanilla extract
- 1/2 teaspoon professional red food coloring (gel recommended)
- 2 cups (240 g) all-purpose flour, sifted with dry ingredients
- 1/3 cup (35 g) cocoa powder, unsweetened, preferably Dutch-processed
- 1 1/2 teaspoons baking powder
- 1/2 teaspoon salt
- 1/2 cup (100 g) granulated sugar, for coating
- 1/2 cup (60 g) powdered sugar, for coating
Instructions
- Step 1: Set your oven to 350°F (177°C). Line a baking sheet with parchment paper and set aside.

- Step 2: In a large mixing bowl, cream together 1/2 cup unsalted butter, 3/4 cup light brown sugar, and 1/2 cup granulated sugar until light and fluffy. This typically takes about 3-5 minutes. Proper creaming incorporates air that gives your cookies a tender texture.
- Step 3: Scrape down the bowl and add 2 large eggs one at a time, beating well after each addition. This ensures smooth batter with well-distributed moisture and structure.
- Step 4: Stir in 2 teaspoons vanilla extract and 1/2 teaspoon red food coloring thoroughly until evenly blended for consistent red color throughout.
- Step 5: In a separate bowl, sift together 2 cups all-purpose flour, 1/3 cup cocoa powder, 1 1/2 teaspoons baking powder, and 1/2 teaspoon salt. Sifting combines and aerates these ingredients, helping produce a lighter cookie texture.
- Step 6: Add the sifted dry ingredients to the wet mixture and beat just until combined. Avoid overmixing; a slightly lumpy batter is desirable for a fudgy texture.
- Step 7: Fill one bowl with 1/2 cup granulated sugar and another with 1/2 cup powdered sugar for rolling the cookie dough balls.
- Step 8: Using a tablespoon-sized cookie scoop (about 1 ounce), scoop dough and level it for uniform cookie size, which promotes even baking.
- Step 9: Roll each dough ball first in granulated sugar, then in powdered sugar, coating completely. This double coating promotes the signature crinkle effect and a sweet exterior texture.
- Step 10: Place coated cookie balls on the prepared parchment-lined baking sheet spaced approximately 1 inch apart to allow spreading without merging.
- Step 11: Bake for 10 minutes at 350°F (177°C) until the cookies puff up and crack on top but remain slightly gooey in the center. Watch for those cracks as a key visual cue of doneness.
- Step 12: Allow cookies to cool on the baking sheet for a few minutes before transferring to a wire rack to finish cooling. This resting helps centers set while keeping them moist. Serve with a glass of milk or your preferred pairing.

Notes
- Room Temperature: Store cookies in an airtight container away from heat or direct sunlight for up to 3 days.
- Refrigeration: Homemade cookies can be kept airtight in the refrigerator for up to 7 days. Bring back to room temperature before serving.
- Freezing: Wrap cookies tightly in plastic wrap, place in freezer-safe container, and freeze for up to 3 months. Thaw at room temperature before eating.
- If cookies spread too much, chill the dough for 30 minutes before baking to help maintain shape.
- Rotate the baking sheet halfway through baking (after about 5 minutes) for even cooking.
- For dryer cookies, adhere strictly to 10-minute bake time and remove once tops are puffed and cracked.
- For a stronger crackled look, roll cookie balls twice in powdered sugar: once before baking and once after cooling.
- If dough is sticky to handle, dust your hands with extra granulated sugar to shape easily without compromising flavor.
- Serve with creamy vanilla ice cream, rich chocolate mousse, fresh berries, or whipped cream.
- Use as cookie sandwiches filled with cream cheese frosting or crumble over ice cream sundaes and dessert trifles.
- Top with melted chocolate drizzle, powdered sugar dusting, or a cream cheese glaze for extra flavor and elegant presentation.
Ingredient Notes
- All-purpose flour: Use a high-quality all-purpose flour to give the cookies a soft texture and the right structure. Look for a fine consistency for better results.
- Cocoa powder: Dutch-processed cocoa adds a deeper chocolate flavor and helps darken the dough. Make sure it’s unsweetened to keep the sweetness balanced.
- Granulated sugar: This is key for sweetness and helps the cookies spread slightly. Opt for fine granulated sugar to ensure it incorporates well into the dough.
- Brown sugar: Use light brown sugar for moisture and a slight caramel flavor, enhancing the cookies’ chewiness. Dark brown sugar works too if you prefer a richer taste.
- Vegetable oil: This keeps the cookies soft and moist. It also helps achieve the right texture since it blends easily into the dough compared to butter.
- Vanilla extract: A splash of pure vanilla extract adds warmth and depth to the flavor of the cookies. Go for pure rather than imitation for the best taste.
- Red food coloring: Gel food coloring works best to achieve that deep red hue without affecting the dough’s consistency too much. Liquid dyes can add extra moisture, so be cautious.
- Powdered sugar: This is for rolling the cookies, giving a lovely crackly appearance. Try to use a fine powdered sugar for a smooth finish.
Recipe Tips
- If your cookies spread too much, chill the dough for 30 minutes before baking to help them hold their shape better in the oven.
- When cookies bake unevenly, rotate the baking sheet halfway through, around 5 minutes into baking, for uniform heat distribution and consistent results.
- If your cookies become dry, aim to bake them for exactly 10 minutes and remove them once they puff up and crack at the tops.
- For a more pronounced crackled exterior, roll the cookie balls in powdered sugar twice, first before baking and again after cooling for better texture.
- If the cookies are too sticky to handle, dust your hands with extra granulated sugar, which helps with shaping without compromising flavor.
Serving Suggestions
Serve red velvet cookies alongside creamy vanilla ice cream or rich chocolate mousse for a sweet treat. A side of fresh berries or whipped cream adds a nice touch.
Use red velvet cookies to make delightful cookie sandwiches filled with cream cheese frosting or to crumble over ice cream sundaes. Add these cookies as a topping for a luscious dessert trifle.
Top with a drizzle of melted chocolate or a dusting of powdered sugar for an elegant finish. Consider pairing with a simple cream cheese glaze for extra flavor enhancement.
Recipe variations
- You can use Dutch-processed cocoa powder instead of natural cocoa for a smoother chocolate flavor in red velvet cookies, adjusting baking powder to 1 teaspoon for proper rise.
- Add 1 teaspoon of almond extract or 1 tablespoon of finely chopped pecans to give a nutty or aromatic twist to the cookie dough before baking.
- Either unsalted butter or margarine can be used to create chewy cookies; if using margarine, watch the baking time as it may finish slightly faster than butter.
- If making a double batch, use 1 cup unsalted butter and 1 1/2 cups light brown sugar while baking cookies on two separate sheets to prevent crowding, similar to my Brown Butter Chocolate Chip Cookies.
Save This Recipe!
How to Store?
To keep your red velvet cookies fresh and delicious, follow these storage tips:
Room Temperature: Place cookies in an airtight container at room temperature up to 3 days. Keep them away from direct sunlight or heat sources.
Refrigeration: Store cookies in an airtight container in the refrigerator up to 7 days. Allow cookies to return to room temperature before serving.
Freezing: Wrap cookies tightly in plastic wrap, place in a freezer-safe container, freeze up to 3 months. Thaw at room temperature before eating.
Other Recipes You’ll Love
If you enjoyed this red velvet cookies or any other recipe on my blog, please leave a ⭐ star rating and let me know how it went in the comments below. I appreciate taking time to read about this recipe, thank you!