
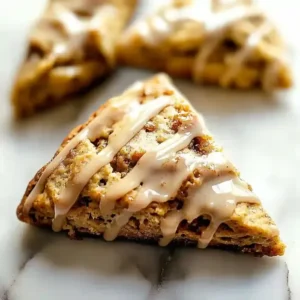
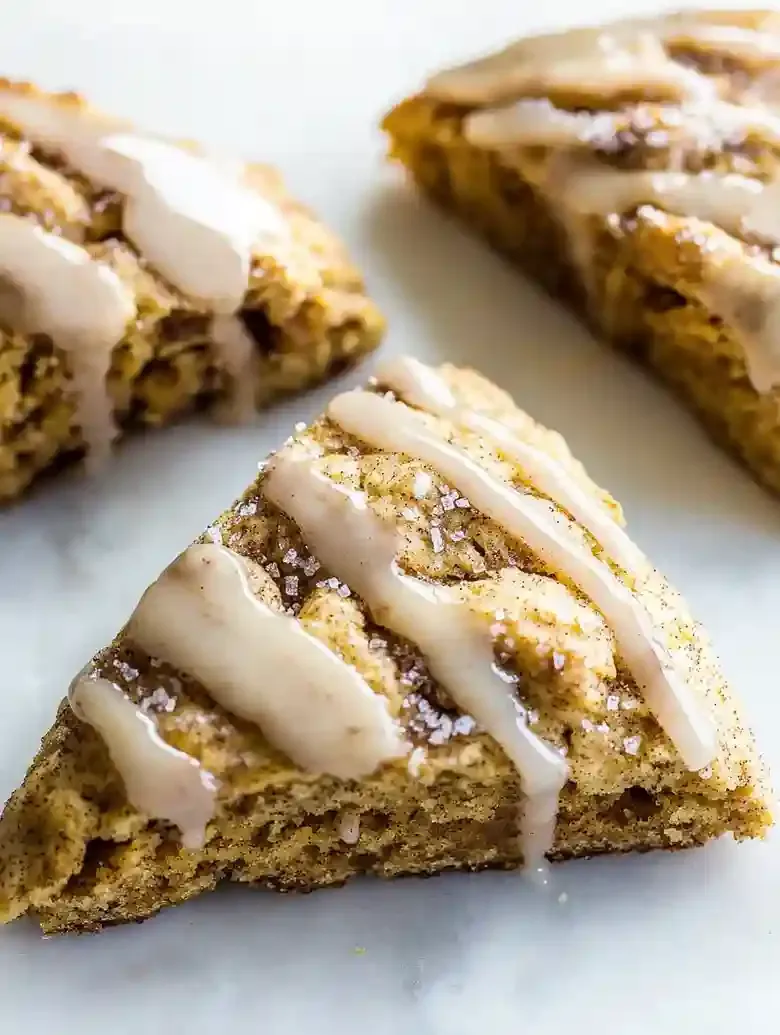
If you’re craving something warm and cozy on a fall morning, these pumpkin snickerdoodle scones are just the treat you need! With their flaky texture and hints of spice, they capture the essence of autumn in every bite.
This pumpkin snickerdoodle scone recipe solves problems with flat, dense texture and uneven flavor distribution, providing reliable rise and autumn-inspired seasoning for tasty results.
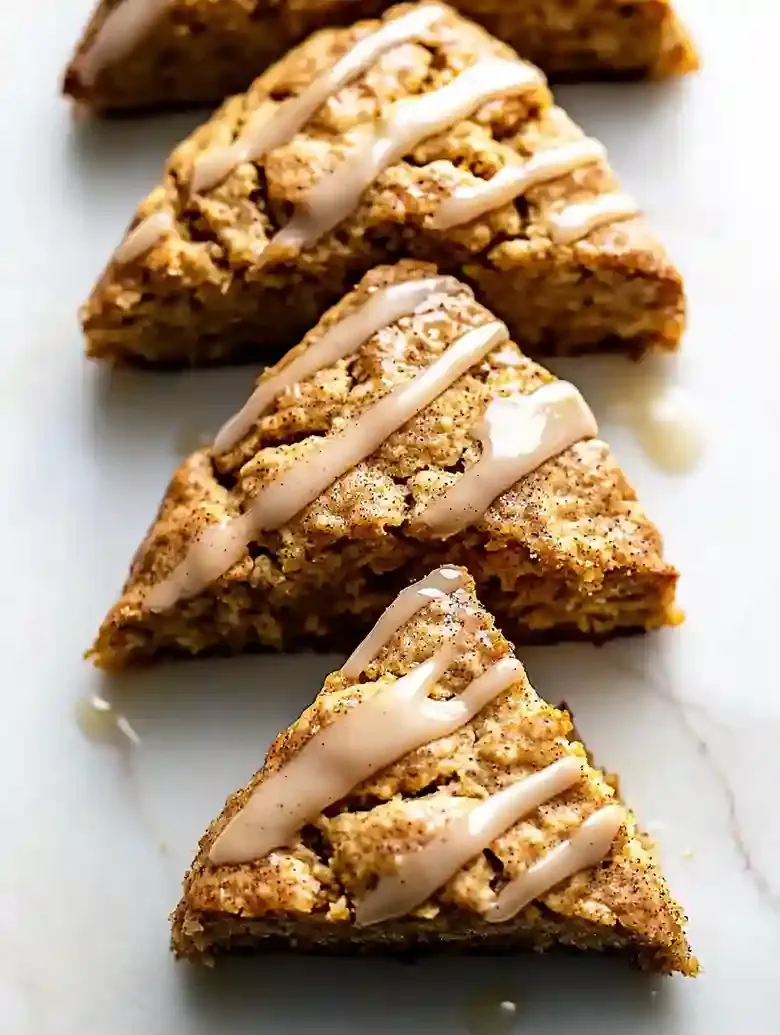
I remember the first time I tried baking scones; they didn’t rise as much as I hoped, leaving me frustrated. But these scones are sheltering, thanks to a reliable method I’ve figured out! No more flat disks, these scones will lift your spirits on a busy morning or when friends unexpectedly drop by.
These scones come together in no time, ready to enjoy in about 45 minutes. They’re ideal alongside your morning coffee or tea, bringing smiles through the lovely smell of cinnamon and sugar filling your kitchen. If you want something that pairs perfectly with these scones, check out my Lemon Lavender Scones!
Table of contents
Dietary Considerations
- This recipe is not gluten-free due to the inclusion of all-purpose flour in the dough mixture.
- The recipe contains butter and heavy cream, so it is unsuitable for vegan diets.
- This recipe does not meet keto or low-carb diets because of brown sugar and pumpkin puree content.
- The recipe is nut-free as it does not include nuts or nut-based ingredients in any form.
- This recipe is not dairy-free due to butter and heavy cream included in the ingredient list.
Why You Will Love This Recipe
- Flaky Texture These Pumpkin Snickerdoodle Scones come out with a wonderfully flaky texture thanks to the cold, grated butter. This method keeps your dough light and airy, giving each bite a satisfying crumble.
- Seasonal Flavors The warm spices from the pumpkin pie spice and cinnamon perfectly embody the essence of fall. With every taste, you’ll get that nostalgic feeling of cozy autumn days, making these scones a seasonal highlight.
- Quick Prep Time With only 20 minutes of prep, these scones are an easy choice for a spontaneous baking session. You’ll have fresh treats ready to enjoy in no time, making them ideal for unexpected guests or busy mornings.
- Delicious Maple Glaze Drizzling a luscious maple glaze over the top adds a touch of sweetness, complementing the scone’s flavors beautifully. It gives them a festive flair that elevates any coffee break or afternoon snack.
How to Make Pumpkin Snickerdoodle Scones
- Prep Time: 20 minutes
- Cool Time:
- Cook Time: 25 minutes
- Total Time: 45 minutes
- Yield: 8 scones 1x
- Category: Baking
- Method: Baking
- Cuisine: American
- Diet: Vegetarian
Description
Delicious pumpkin snickerdoodle scones with a flaky texture and warm spices, perfect for fall.
Ingredients
- 2 cups (250 g) all-purpose flour, preferably unbleached
- 1/2 cup (113 g) unsalted butter, frozen
- 1/2 cup (100 g) light brown sugar
- 1/2 cup (120 g) canned pumpkin puree, blotted to remove excess moisture
- 1/3 cup + 2 tablespoons (112 ml total) heavy cream
- 1 large egg, room temperature
- 1 teaspoon pure vanilla extract
- 2 1/2 teaspoons baking powder, fresh
- 1 teaspoon ground cinnamon, high-quality
- 1 1/2 teaspoons pumpkin pie spice
- 1/2 teaspoon salt
- Coarse sugar (optional), for topping
Instructions
- Step 1: Set your oven to 400°F (204°C) and allow it to fully heat. Adjust the baking rack to the middle position and prepare baking sheets by lining with parchment or lightly greasing.

- Step 2: In a large bowl, whisk together 2 cups of all-purpose flour, 2 1/2 teaspoons baking powder, 1 teaspoon ground cinnamon, 1 1/2 teaspoons pumpkin pie spice, and 1/2 teaspoon salt to evenly distribute the leavening and spices.
- Step 3: Using a box grater, grate the frozen unsalted butter directly into the dry mixture. This helps create small butter pieces that produce the flaky texture expected in the scones. Combine the butter and dry ingredients gently to coat butter pieces with flour.
- Step 4: In a separate bowl, whisk together 1/2 cup blotted pumpkin puree, 1 large egg, 1/3 cup + 2 tablespoons heavy cream (a total of 112 ml), and 1 teaspoon pure vanilla extract until fully combined with no liquid pockets.
- Step 5: Pour the wet ingredients into the dry mixture. Gently stir just until the dough comes together, avoiding overmixing to prevent toughness; a slightly crumbly texture is acceptable. If the dough appears too wet and sticky, add 1 tablespoon flour at a time, folding gently, until it holds together without stickiness.
- Step 6: Turn the dough onto a floured surface. Pat and shape it into an 8-inch (20 cm) diameter disc using your hands or a rolling pin. This shape ensures even baking and ease when cutting the scones. If dough feels too soft and spreads excessively, chill for 15 minutes before shaping.
- Step 7: Brush the top of the dough disc with a bit of heavy cream to enhance browning and help the sugar adhere. Generously sprinkle coarse sugar over the surface for a crunchy topping that contrasts with the scone’s tender crumb.
- Step 8: Place the baking sheet with the shaped dough in the preheated oven. Bake for 20 to 25 minutes or until the tops are lightly browned and golden, indicating the scones are cooked through and fluffy inside. If browning is uneven, rotate the baking sheet halfway through baking.
- Step 9: While the scones bake, prepare the maple glaze by whisking glaze ingredients together (specific glaze recipe details not provided here; refer to your standard maple glaze recipe). Make the glaze toward the end of baking to keep it fresh and drizzly.
- Step 10: When the scones come out of the oven and are still warm, drizzle the maple glaze evenly over the tops. The warm scones will absorb the glaze for optimal flavor.

Notes
- Room Temperature: Store cooled scones in an airtight container at room temperature for up to 2 days to maintain texture and flavor.
- Refrigeration: Place scones in an airtight container and refrigerate for up to 7 days to preserve freshness.
- Freezing: Wrap each scone individually in plastic wrap, place in a freezer bag, and freeze for up to 3 months. Thaw at room temperature before serving.
- Use fresh baking powder (no older than 6 months) to ensure proper rise and avoid dense scones.
- Grating frozen butter helps distribute the fat evenly in the flour, creating flaky layers. Do not let the butter thaw before incorporating.
- If dough is too wet, add additional flour 1 tablespoon at a time.
- For dough that spreads too much during baking, chill the dough for 15 minutes before shaping to firm it up.
- If scones are not browning after 20 minutes, rotate the pan to ensure even cooking and check for doneness.
- If glaze thickens before use, thin with 1 teaspoon heavy cream until it reaches a drizzling consistency.
- Reheat scones in a 350°F (177°C) oven for about 5-7 minutes until warmed through to maintain texture without drying out.
- Serve the scones with a side of apple cider or chai tea to complement the warm spices.
- They also pair well with a simple green salad or roasted squash for a balanced meal.
- Use the scones to create breakfast sandwiches or as part of a festive dessert platter alongside cookies and brownies.
- Consider topping with maple syrup or a cream cheese glaze and sprinkling with chopped nuts or cinnamon for added texture.
- Substitute half and half for heavy cream to reduce richness slightly without compromising moisture.
- Add chopped nuts or chocolate chips to the dough for variety (measurements not specified).
- Top with cream cheese glaze instead of maple glaze for different flavor notes (glaze recipe details not specified).
- Use high-quality, unbleached all-purpose flour for structure and good crumb texture. Avoid bleached flour as it can adversely affect texture.
- Use light brown sugar for caramel-like flavor and moisture; dark brown sugar is also acceptable but produces a stronger flavor.
- Select pure cane coarse sugar for the topping to achieve a satisfying crunch.
- Use fresh, aromatic ground cinnamon and pumpkin pie spice blends for authentic fall flavors; freshly grated nutmeg adds warmth if desired.
- Use cold, unsalted butter to control salt and create flakiness by maintaining small chunks within the dough.
- Use a high-quality canned pumpkin puree, ensuring it is 100% pure pumpkin without additives.
- Use a large, fresh, room temperature egg to bind and enrich the dough properly.
- Heavy cream adds fat necessary for tender and rich scones; half and half can be used as a lighter alternative.
Nutrition
- Serving Size: 1 scone
- Calories: 350
- Sugar: 1g
- Sodium: 600mg
- Fat: 20g
- Saturated Fat: 7g
- Unsaturated Fat: 10g
- Trans Fat: 0g
- Carbohydrates: 15g
- Fiber: 1g
- Protein: 30g
- Cholesterol: 90mg
Ingredient Notes
- All-purpose flour: Look for a good quality unbleached flour. It gives the scones a nice structure and crumb. Avoid bleached flours as they can affect the texture.
- Brown sugar: Use light brown sugar for a hint of caramel flavor. It helps to keep the scones moist and adds depth. Dark brown sugar works too but can be more intense.
- Granulated sugar: This is for the cinnamon-sugar topping! Select pure cane sugar for the best crunch. It’ll balance the sweetness of the scone.
- Baking powder: Make sure it’s fresh for the best rise. This ingredient is key for fluffy scones, so check the expiration date to avoid flat results.
- Cinnamon: A ground cinnamon with strong aromatic flavor enhances the overall taste. Look for fresh, high-quality cinnamon for a warming spice blend.
- Nutmeg: Use freshly grated nutmeg if possible; it has a richer flavor. Just a pinch adds warmth and complexity, elevating the pumpkin notes!
- Unsalted butter: Opt for high-quality unsalted butter for better control over flavor. Cold butter is essential; it creates flaky layers in the scone when cut into the dry ingredients.
- Pumpkin puree: Use canned puree for convenience, but make sure it’s 100% pure pumpkin without additives. It contributes moisture and flavor; check labels for quality.
- Egg: One large room temperature egg binds the ingredients and adds richness. Use a fresh egg for the best results in texture.
- Heavy cream: This adds necessary fat for rich flavor and tender texture. You can substitute with half and half if you need to lighten it up a bit.
Recipe Tips
- If dough appears too wet, sprinkle in 1 tablespoon of flour at a time and gently fold until the dough holds together without stickiness.
- When scones spread during baking, chill the dough for 15 minutes before shaping to help it maintain its structure in the oven.
- If scones aren’t browning, check for doneness at 20 minutes, and consider rotating the baking sheet for even cooking if needed.
- For dense texture, ensure the baking powder is fresh; replace it if it’s older than 6 months for best leavening results.
- If the glaze thickens before use, thin it with 1 teaspoon of heavy cream until it reaches a drizzling consistency, right before serving.
Serving Suggestions
Serve with a side of apple cider or chai tea for a warm drink pairing. Enjoy alongside a simple green salad or roasted squash for balance.
Use to make pumpkin scone breakfast sandwiches or a cozy pumpkin bread pudding. Add to a festive dessert platter with cookies and brownies.
Top with a drizzle of maple syrup or a cream cheese glaze for extra flavor. Sprinkle with chopped nuts or a sprinkle of cinnamon for added texture.
Recipe variations
- You can use chopped pecans or walnuts in the pumpkin snickerdoodle scones for added crunch, folding in 1/2 cup with the dry ingredients before mixing the dough.
- Add mini chocolate chips, about 1/3 cup, to the wet ingredients for a sweeter variation that pairs well with the warm spices and pumpkin puree in the recipe.
- Either canned pumpkin puree or fresh cooked pumpkin can be used, making sure to blot excess moisture for the dough. Fresh pumpkin may require slightly more drying.
- If using this recipe for more servings, double all ingredient amounts. Bake in batches on separate sheets at 400°F for 25 minutes each for best results with crisp edges.
Save This Recipe!
How to Store?
To keep your pumpkin snickerdoodle scones fresh and delicious, follow these storage tips:
Room Temperature: Store pumpkin snickerdoodle scones in an airtight container at room temperature up to 2 days to preserve texture and flavor.
Refrigeration: Place scones in an airtight container inside the refrigerator for up to 7 days to maintain freshness and prevent spoilage.
Freezing: Wrap scones individually in plastic wrap and place in a freezer bag for up to 3 months. Thaw at room temperature.
Other Recipes You’ll Love
- Toasted Coconut Marshmallows
- Puff Pastry Apple Rosettes
- Rhubarb and Strawberry Tart Recipe
- Chocolate Peanut Clusters
If you enjoyed this Pumpkin Snickerdoodle Scones or any other recipe on my blog, please leave a ⭐ star rating and let me know how it went in the comments below. I appreciate taking time to read about this recipe, thank you!