
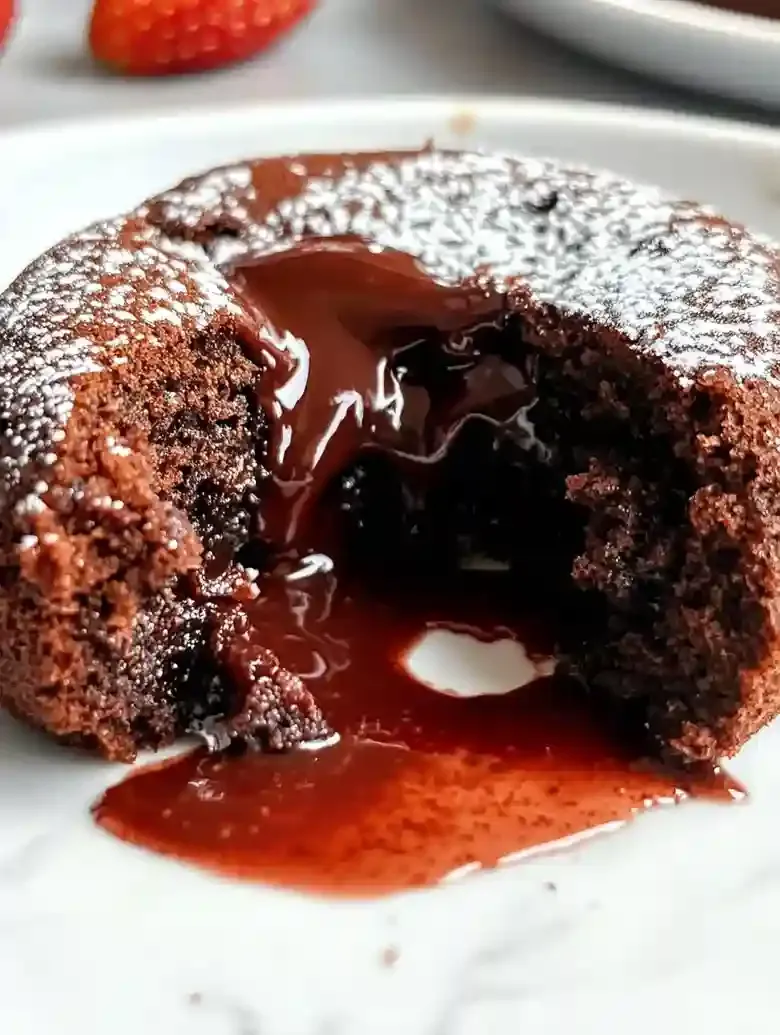
These mini lava cakes are a charming way to celebrate Valentine’s Day with someone special. With their rich chocolate centers, they’re the kind of dessert that makes hearts flutter and taste buds sing.
This recipe addresses challenges of achieving a gooey center and maintaining texture, common issues experienced by those preparing mini lava cakes.
I remember the first time I tried to bake a lava cake. I accidentally overcooked it, and instead of that gooey middle, I ended up with just a dense chocolate lump. This recipe really helps avoid that pitfall, making it easy for anyone to create a lovely treat for date night.
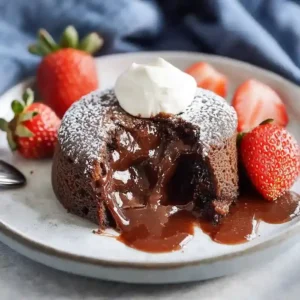
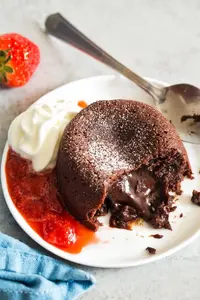
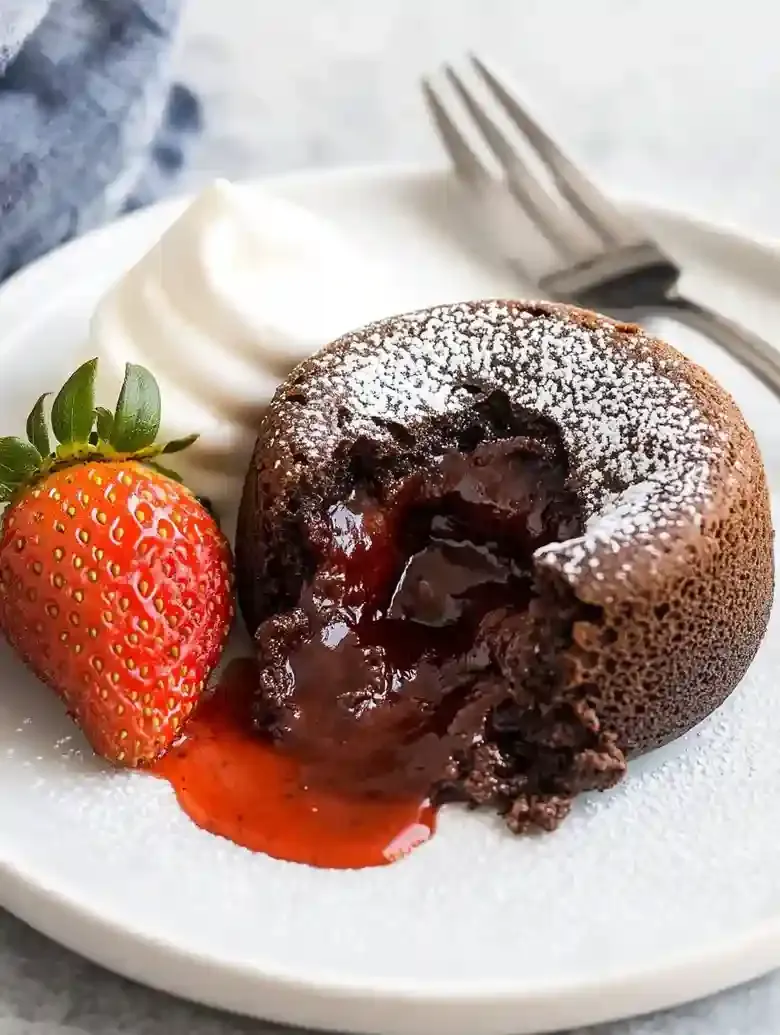
What I love about these cakes is how quickly they come together. You can whip up the batter in just 15 minutes, and they’ll be ready in about 10 more! Serve them warm with a dollop of whipped cream and a drizzle of strawberry sauce for that extra touch.
If you want to impress your loved one even more, check out my Chocolate Peanut Clusters. They’re a fun sweet treat to add to your celebration!
Table of contents
Why You Will Love This Recipe
- Decadent Chocolate Experience – The bittersweet chocolate gives each cake a rich depth while the gooey center oozes delight, ensuring a satisfying moment for chocolate lovers.
- Quick Dessert Fix – In just 15 minutes of prep and 10 minutes in the oven, you’ve got a glamorous dessert that’s ready to impress without breaking a sweat.
- Gooey Center Guaranteed – With a specific baking time, you can achieve that sought-after molten middle, perfectly contrasting with the slightly firm outer edges.
- Ideal for Special Moments – These mini lava cakes set the scene for romance, making them a thoughtful choice for date nights, anniversaries, or any celebration that needs a sweet touch.
Mini Lava Cakes For Two
- Prep Time: 15 minutes
- Cool Time: 0 minutes
- Cook Time: 10 minutes
- Total Time: 25 minutes
- Yield: 2 1x
- Category: dessert
- Method: Baking
- Cuisine: American
- Diet: Vegetarian
Description
Delicious mini lava cakes perfect for two, featuring a rich chocolate center.
Ingredients
- 1/4 cup (2 ounces, 57 g) unsalted butter, softened
- 3 ounces (85 g) bittersweet chocolate, preferably 60-70% cocoa content
- 1 large egg, room temperature
- 1 large egg yolk, room temperature
- 2 tablespoons (25 g) granulated sugar
- 1 tablespoon (8 g) all-purpose flour
- 1 teaspoon vanilla extract, pure
- 1/2 teaspoon espresso powder (optional)
- 1/8 teaspoon table salt (omit if using salted butter)
- Whipped cream, as desired
- Strawberry sauce, as desired
Instructions
- Step 1: Preheat your oven to 450°F (232°C). Lightly grease two 6-ounce ceramic ramekins to ensure the cakes release easily after baking.

- Step 2: Pour about an inch (2.5 cm) of water into a small saucepan and bring it to a simmer over medium heat. This will be used as a double boiler to gently melt chocolate and butter.
- Step 3: Remove the saucepan from heat. Place a heatproof bowl over the saucepan (not touching the water) and add the butter and bittersweet chocolate. Stir continuously until fully melted and smooth. Remove from heat.
- Step 4: Allow the melted chocolate and butter mixture to cool slightly to avoid cooking the eggs in the next step.
- Step 5: In a mixing bowl, use an electric mixer on high speed to beat the egg, egg yolk, and granulated sugar until thickened and pale, about 2-3 minutes. The mixture should have a ribbon-like consistency when the beaters are lifted.
- Step 6: Reduce mixer speed to low. Gradually add the cooled chocolate mixture, vanilla extract, espresso powder (if using), and salt to the egg mixture, combining thoroughly but gently to avoid splattering.
- Step 7: Using a rubber spatula, carefully fold in the all-purpose flour by hand until just combined. Avoid overmixing to keep the batter light and tender. It is acceptable to have a few small lumps of flour.
- Step 8: Divide the batter evenly between the prepared ramekins, filling each about three-quarters full. Bake in the preheated oven for 8-10 minutes, or until the edges and top of the cakes appear firm but the centers remain soft and slightly wobbly.
- Step 9: Let the cakes cool in the ramekins for about 1 minute. Carefully invert each ramekin onto a plate and gently lift it away. Handle delicately to maintain the molten center’s shape.
- Step 10: Serve the lava cakes immediately with a generous dollop of whipped cream and a drizzle of strawberry sauce. Optionally, add a scoop of vanilla ice cream or fresh berries for additional contrast.
Notes
- Room Temperature: Store leftover cakes in an airtight container at room temperature for up to 1 day, avoiding direct sunlight to preserve texture.
- Refrigeration: Keep cakes in an airtight container in the refrigerator for up to 3 days. Warm briefly before serving to restore softness.
- Freezing: Wrap each cake individually in plastic wrap and place in a freezer-safe container for up to 1 month. Thaw overnight in the refrigerator before reheating.
- If cakes appear unset after the full baking time, continue baking an additional 1-2 minutes for a gooey center without overcooking.
- If cake edges rise excessively, reduce baking time slightly in the next batch to keep centers moist and molten.
- When checking doneness, gently jiggle the ramekins; a slight wobble in the center indicates a molten middle.
- If cakes stick to ramekins, allow to cool for 2 minutes before carefully running a knife around edges to loosen them.
- To avoid lumpy batter, ensure that the melted chocolate has cooled enough before mixing it with the eggs to prevent scrambling.
Nutrition
- Serving Size: 1 cake
- Calories: Not specified
- Sugar: Not specified
- Sodium: Not specified
- Fat: Not specified
- Saturated Fat: Not specified
- Unsaturated Fat: Not specified
- Trans Fat: Not specified
- Carbohydrates: Not specified
- Fiber: Not specified
- Protein: Not specified
- Cholesterol: Not specified
Ingredient Notes
- Bittersweet chocolate: Go for high-quality bittersweet chocolate to create a rich, gooey center. Look for brands that have a cocoa content of 60-70% for the best flavor.
- Unsalted butter: I prefer unsalted butter to control the sweetness. It’s vital for a silky texture in the batter, so make sure it’s softened but not melted.
- Granulated sugar: Regular granulated sugar works best for sweetness. It helps with browning and provides the perfect balance against the rich chocolate flavor.
- All-purpose flour: Use good quality all-purpose flour for structure. It helps the cakes rise properly while keeping that delightful molten center. Don’t overmix to avoid a dense texture!
- Eggs: Two large eggs at room temperature add moisture and stability to the batter. This is key for achieving that gooey center everyone loves.
- Vanilla extract: A splash of good vanilla extract enhances the chocolate flavor. Choose pure vanilla for the best aroma and taste. Avoid imitation vanilla for a more pronounced flavor.
Recipe Tips
- If cakes seem unset after 10 minutes, bake an additional 1-2 minutes for a gooey center without overcooking.
- If cake edges rise too much, reduce baking time slightly next time to keep the centers soft and melted.
- When checking for doneness, gently jiggle the ramekins; if centers wobble, they’re likely molten.
- If cakes stick to ramekins upon unmolding, let cool for 2 minutes before carefully running a knife around the edges.
- If batter appears lumpy after mixing, ensure the melted chocolate has cooled slightly to avoid seizing the eggs.
Serving Suggestions
Serve mini lava cakes warm with whipped cream and a drizzle of strawberry sauce. A scoop of vanilla ice cream or fresh berries adds a lovely touch.
Add to a dessert platter featuring macarons or chocolate truffles. Use the batter to create mini chocolate muffins or brownies for a twist.
Top with a dusting of powdered sugar or a chocolate ganache for an elegant finish. A sprinkling of sea salt can accentuate the chocolate flavor beautifully.
Recipe variations
- You can use bittersweet or semisweet chocolate depending on your cocoa preference for these lava cakes. Bittersweet offers deeper flavor, while semisweet provides a milder taste.
- Add 1/2 teaspoon espresso powder to boost the chocolate taste subtly, especially appreciated by coffee lovers. This optional addition enhances flavor intensity without overwhelming the cake.
- Either all-purpose flour or gluten-free flour can be used. If choosing gluten-free, adjust baking time slightly. This variation supports dietary needs without sacrificing texture.
- If preparing for more than two, double the ingredients and bake the batter in four ramekins. Bake for 8-10 minutes each while checking centers for soft texture. For a complementary treat, consider serving alongside my Slow Cooker Pumpkin Hot Chocolate.
Save This Recipe!
How to Store?
To keep your mini lava cakes for two fresh and delicious, follow these storage tips:
Room Temperature: Store in an airtight container at room temperature up to 1 day. Keep away from direct sunlight to maintain texture.
Refrigeration: Place cakes in an airtight container in the fridge up to 3 days. Warm briefly before serving for best softness.
Freezing: Wrap each cake individually in plastic wrap, place them in a freezer container up to 1 month. Thaw overnight in the refrigerator.
Other Recipes You’ll Love
- Gluten Free Amaranth Cake
- Gluten Free Almond Cake
- Gluten Free Lime Agave Cupcakes
- Gluten Free Apple Bundt Cake
If you enjoyed this lava cakes or any other recipe on my blog, please leave a ⭐ star rating and let me know how it went in the comments below. I appreciate taking time to read about this recipe, thank you!