
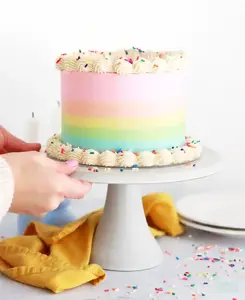
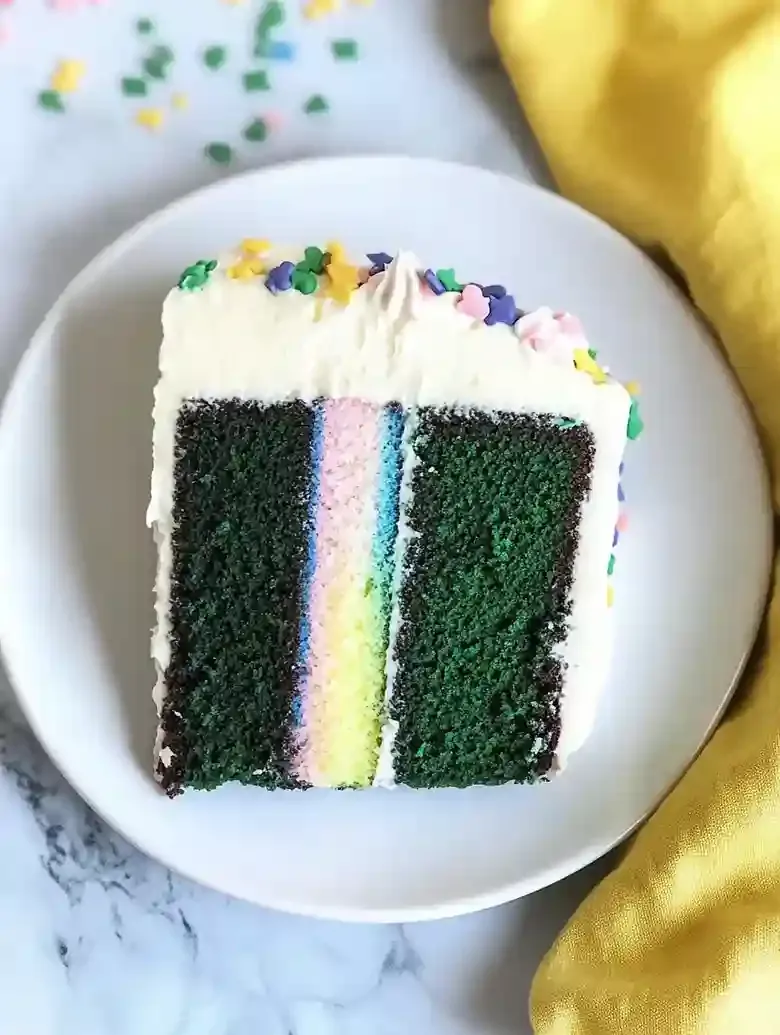
When it comes to a festive treat like green velvet cake, nothing says celebration quite like this gorgeous dessert adorned with rainbow frosting. Ideal for St. Patrick’s Day, it’s a cake that surprises both the eyes and the taste buds.
This cake recipe solves issues related to dryness and lack of color that often arise in festive desserts during celebrations.

I’ve faced the challenge of ensuring that every slice is moist without becoming overly dense. A common struggle is achieving that vibrant green hue while still keeping the flavor in check. I’ve honed my method to make sure each layer is not only stunning but also satisfying.
This well-tested recipe can be whipped up in about 4 hours and serves a generous 15 slices, making it a great choice for parties or family get-togethers. The rich texture and delightful taste set it apart from typical desserts, ensuring it never goes unnoticed on dessert tables.
If you’re on the hunt for something to accompany this cake, you’ll definitely want to check out my Strawberry Shortcake Cake Roll.
Table of contents
Why You Will Love This Recipe
- Uniquely Festive Touch , The vibrant green hue of this cake isn’t just eye-catching; it evokes a sense of celebration. It’s an ideal choice for events like St. Patrick’s Day, adding a whimsical flair to your dessert table.
- Soft and Fluffy Texture , Thanks to the cake flour and buttermilk, this cake boasts a tender crumb that’s moist and airy. Every slice offers a melt-in-your-mouth experience, making it hard to resist.
- Rich Yet Balanced Flavor , The touch of cocoa powder adds a surprising depth to the cake without overpowering the vanilla. This mild chocolate flavor harmonizes beautifully with the sweet rainbow frosting, creating an enjoyable experience.
- Fun for Everyone , The colorful frosting not only makes this cake visually appealing, but it also invites creativity. Encourage friends or family to help decorate it with their favorite rainbow colors, making baking a shared experience!

Green Velvet Cake with Rainbow Frosting
- Prep Time: 45 minutes
- Cool Time: 3 hours
- Cook Time: 30 minutes
- Total Time: 4 hours 15 minutes
- Yield: 15 slices 1x
- Category: Dessert
- Method: Baking
- Cuisine: American
- Diet: Vegetarian
Description
A moist, vibrant green velvet cake suitable for St. Patrick’s Day celebrations or any festive occasion.
Ingredients
- 2 cups (212 g) cake flour
- 3 Tbsp natural unsweetened cocoa powder
- 1 tsp baking soda
- ½ tsp salt
- ½ cup (113 g) unsalted butter
- 1 ½ cups (300 g) granulated sugar
- ½ cup (120 ml) vegetable oil, neutral-flavored
- 2 large eggs, at room temperature
- 2 tsp vanilla extract
- 2 tsp distilled white vinegar (can substitute apple cider vinegar)
- 1 cup (240 ml) buttermilk
- Green food color gel, ½ tsp for vibrant hue
Instructions
- Step 1: Preheat Your Oven: Heat your oven to 350°F (177°C). Allow enough time for the oven to reach this temperature to ensure even baking.

- Step 2: Prep Cake Pans: Lightly grease three 8-inch cake pans with cooking spray. Line each pan’s bottom with parchment paper to prevent sticking and improve clean release. Set aside.
- Step 3: Mix Dry Ingredients: In a large bowl, whisk together the cake flour, cocoa powder, baking soda, and salt until fully blended and even. This step ensures the leavening agents are well distributed, preventing baking issues.
- Step 4: Cream Together Mixtures: Using an electric mixer, beat the unsalted butter for 2 minutes until light and creamy. Add vegetable oil and granulated sugar, mixing thoroughly until the mixture is smooth and fluffy. This process incorporates air essential for a light cake texture.
- Step 5: Add Eggs Gradually: Add the eggs one at a time, mixing fully after each addition. Next, mix in the vanilla extract and distilled white vinegar carefully to ensure they incorporate evenly. Folding gently with a spatula after mixing can improve consistency.
- Step 6: Combine Wet and Dry Ingredients: Alternately add the flour mixture and the buttermilk in three additions, starting and ending with the flour mixture. Mix gently with each addition until just combined to avoid overmixing, which can lead to a dense cake.
- Step 7: Add Green Food Color: Stir in ½ teaspoon green gel food coloring evenly into the batter for a vibrant green color without affecting texture.
- Step 8: Bake for Doneness: Divide batter evenly among the prepared pans. Bake in the preheated oven for 30 to 35 minutes until the tops are lightly golden and a gentle press springs back. For excessive doming, reduce the temperature to 325°F (163°C) after 15 minutes. If baking extends beyond 35 minutes, press the center lightly; if it springs back, the cake is done.
- Step 9: Cool Cakes in Pans: Let the cakes cool in their pans for 5 minutes. Then, carefully transfer them onto cooling racks to cool completely. Rotate pans halfway if cooling unevenly to promote uniform temperature.
Notes
- Room Temperature: Store the cake layers in an airtight container at room temperature for up to 2 days, avoiding direct sunlight or heat sources.
- Refrigeration: Keep layers in an airtight container in the refrigerator for up to 5 days. Bring to room temperature before serving to enhance flavor and texture.
- Freezing: Wrap cake layers tightly in plastic wrap and place in a freezer-safe container for up to 3 months. Thaw overnight in the refrigerator before use.
- Use cake flour for a fine, soft texture; avoid all-purpose flour which can make the cake dense.
- Use fresh baking soda to ensure proper rise and fluffiness.
- The vinegar reacts with baking soda to create a softer crumb and enhance the green color.
- Overmixing after adding flour can lead to a tough cake; mix just until flour disappears.
- If batter seems dry, add 1-2 tablespoons of buttermilk before baking to improve moisture.
- Fold batter gently with a spatula after mixing to fix uneven mixing issues and achieve better texture.
- Large eggs should be at room temperature for better incorporation.
- Neutral-flavored vegetable oil keeps the cake soft without overpowering flavors.
- If cakes dome too much or brown unevenly, adjust oven temperature or pan position accordingly.
Nutrition
- Serving Size: 1 slice
- Calories: 350 calories
- Sugar: 300g
- Sodium: ½ tsp (salt content approx. 1,200mg)
- Fat: 113g unsalted butter + 120ml vegetable oil (approximate fat 20-25g total)
- Saturated Fat: from butter (approx. 7g)
- Unsaturated Fat: from vegetable oil and butter (approx. 10g)
- Trans Fat: 0g
- Carbohydrates: 212g cake flour + sugar + cocoa powder total approx. 15g carbohydrates + sugar contributions
- Fiber: 1g (from cocoa powder)
- Protein: from eggs and flour approx. 30g
- Cholesterol: approx. 90mg (from eggs and butter)
Ingredient Notes
- Cake flour: Use a good quality cake flour for a light texture. Avoid all-purpose flour as it can make the cake dense and heavy.
- Granulated sugar: I recommend using fine granulated sugar for even sweetness throughout. It dissolves better, helping to achieve a smooth batter.
- Cocoa powder: Go for high-quality unsweetened cocoa powder. It gives the cake a rich chocolate flavor without adding sweetness. Dutch-processed works well for a deeper color.
- Baking soda: This leavening agent is crucial for fluffiness. Make sure it’s fresh to ensure a good rise in your cake.
- Vinegar: A splash of vinegar helps enhance the green color and keeps the cake moist. You can use white vinegar or apple cider vinegar interchangeably.
- Vegetable oil: Choose a neutral-flavored oil for moisture. It keeps the cake soft and tender, which is key to that velvet texture.
- Eggs: Use large eggs at room temperature to help bind the ingredients and add moisture, contributing to the cake’s structure.
- Butter: I suggest unsalted butter for frosting. This way, you can control the sweetness. It adds a creamy texture when whipped with sugar.
- Powdered sugar: Opt for finely sifted powdered sugar for a smooth frosting. This prevents grittiness and helps achieve the right consistency.
- Milk: Use whole milk for frosting for a creamy texture. It blends well, providing a rich mouthfeel to the frosting.
- Food coloring: Gel food coloring works best to achieve vibrant hues without altering the frosting’s texture. Liquid color could change the consistency.
- Vanilla extract: Use pure vanilla extract for the most authentic flavor in your frosting. I recommend avoiding imitation vanilla as it doesn’t impart the same depth of taste.
Recipe Tips
- If the cake domes too much while baking, reduce the oven temperature to 325ºF after 15 minutes for the remainder of the baking time.
- When the cake takes longer than 35 minutes, check doneness by gently pressing the center with your finger; if it springs back, it’s done.
- If your cakes cool unevenly, rotate the pans halfway through the cooling period to promote a more uniform temperature distribution.
- For dryness, add 1-2 tablespoons of buttermilk to the batter if the cakes seem dry after mixing and before baking.
- If you notice uneven mixing, use a spatula to fold the batter gently after mixing for a smoother consistency and better texture.
Serving Suggestions
Serve slices of green velvet cake with whipped cream or a fruit medley that includes strawberries and blueberries. Pair with a light coffee or herbal tea for an enjoyable treat.
Add to dessert platters featuring assorted cupcakes or cookies for a vibrant display. Use slices in trifle desserts layered with yogurt and seasonal fruits for a delightful twist.
Top with a berry compote or chocolate ganache for a richer flavor. Drizzle with cream cheese frosting for added sweetness and visual appeal on your cake.
Recipe variations
- You can use cake flour or all-purpose flour for the green velvet cake. Cake flour yields a softer crumb, while all-purpose offers a firmer texture.
- Add 1/2 teaspoon of vanilla extract and 2 teaspoons of distilled white vinegar to the batter for balanced flavor and crucial leavening effects.
- Either butter or vegetable oil can be used as the fat. Use 1/2 cup of butter or 1/2 cup of oil to maintain proper moisture.
- You can double the ingredient quantities to serve 30 people, adjusting baking time to 35-40 minutes accordingly. This pairs nicely with Pumpkin Coffee Cake for a varied dessert table.
Save This Recipe!
How to Store?
To keep your green velvet cake fresh and delicious, follow these storage tips:
Room Temperature: Place cake in an airtight container at room temperature for up to 2 days. Avoid direct sunlight or heat sources.
Refrigeration: Store in an airtight container in the refrigerator up to 5 days. Bring to room temperature before serving for better flavor.
Freezing: Wrap cake layers tightly in plastic wrap, place in a freezer container for up to 3 months. Thaw overnight in refrigerator.
Other Recipes You’ll Love
If you enjoyed this green velvet cake or any other recipe on my blog, please leave a ⭐ star rating and let me know how it went in the comments below. I appreciate taking time to read about this recipe, thank you!