Description
Create an easy gluten free sourdough starter through simple fermentation methods.
Ingredients
Scale
- 50 grams (1.76 ounces) wholegrain flour, choose good quality for nutty taste
- 60 grams (2.11 ounces) water, filtered and at room temperature
- 30 grams (1.06 ounces) additional wholegrain flour, for feeding
- 40 grams (1.41 ounces) water, for feeding
- 290 grams (10.23 ounces) wholegrain flour, optional combinations include sorghum, buckwheat, brown rice, amaranth, teff, millet, quinoa
Instructions
- Mix Ingredients Together: Start by mixing your chosen gluten-free flour and water in a glass jar. It will have a thick, pasty consistency. Make sure there are no dry patches hiding in the blend, as a smooth mixture will encourage fermentation.
- Cover & Store Jar: Loosely cover the jar with a paper plate or breathable cloth. Place it in a warm spot, avoiding tight seals that could create too much pressure inside.
- Feed the Starter: After a day or so, feed your starter with more flour and water to keep it active. You will notice separation, often with a layer of liquid on top, called hooch. Maintain a steady feeding schedule to avoid hooch formation.
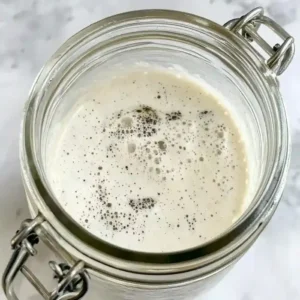
- Watch for Bubbles: Keep an eye out for bubbles forming in the starter as days pass, indicating that it is working hard. It should smell slightly tangy and earthy. If no bubbles appear after several days, the starter may need more warmth or more frequent feedings.
- Monitor Consistency: Over time, observe the texture; it should be thick yet spreadable. Adjust your flour and water ratios if it is too runny or dry. A too-thick starter might struggle to rise.
- Allow It to Mature: After about a week, try using a small amount of the starter in a recipe. It should rise well for gluten-free baking. If it does not rise as expected, give it more time, as it may still not be ready.
Notes
- Store in the refrigerator and feed only when needed.
- If your starter is not bubbling after a few days, keep it in a warm spot, around 75-80 degrees F, and feed it regularly to promote activity.
- If the starter has an off smell, discard it and start fresh to avoid health issues or unpleasant flavors.
- If hooch develops quickly, feed your starter every 12 hours instead of 24 for better results.
- A successful starter requires a combination of wholegrain flours to encourage a strong culture and enhance flavor.
- If you see hooch on top, gently stir it back in before feeding to keep the mixture active and avoid waste.
Nutrition
- Serving Size: 2 cups
- Calories: null
- Sugar: null
- Sodium: null
- Fat: null
- Saturated Fat: null
- Unsaturated Fat: null
- Trans Fat: null
- Carbohydrates: null
- Fiber: null
- Protein: null
- Cholesterol: null