Description
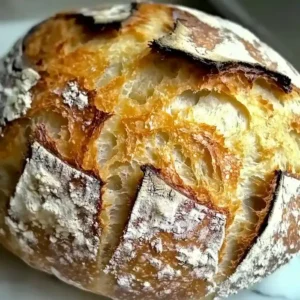
Best ever gluten free sourdough bread recipe that delivers a crispy crust and soft, airy texture, perfect for sandwiches or toast.
Ingredients
Scale
- 390 grams (13.8 oz) Kim’s gluten free bread flour blend, designed for bread
- 60 grams (2.1 oz) gluten free sourdough starter, mature and ripe
- 5 grams (0.2 oz) whole psyllium husks or 1.51/2 teaspoons psyllium husk powder, optional
- 6 grams (0.2 oz) kosher salt
- 10 grams (0.35 oz) heat-activated baking powder, optional
- 390 grams (13.8 oz) water, warm
- 26 grams (0.9 oz) olive oil
- 21 grams (0.74 oz) honey
- 1/4–1/21/2 teaspoon baking soda, optional
Instructions
- Mix the Dough: Start by mixing your gluten-free flour with the active sourdough starter, water, and salt until you achieve a well-combined, sticky dough that looks smooth and slightly tacky. If it feels too dry, you might need to add a splash more water.
- First Rise: Let the dough rise in a warm area for several hours, until it doubles in size and gets nice and puffy. You will notice a slight tangy aroma as it ferments. Be careful not to overproof, as this will affect the dough’s structure.
- Shape Your Loaf: Carefully scoop the airy dough onto a floured surface and gently shape it into a loaf. It should feel soft and elastic. Do not overwork the dough, as it could lose its airy quality. It is ready when it holds a nicely rounded shape without collapsing.
- Second Rise: Let the shaped loaf rise again for about an hour, covered with a cloth. You should see it getting bigger and puffier. If it appears flat after this time, it may need additional rising time.
- Preheat Your Oven: While the loaf is rising, preheat your oven to a high temperature. This step is crucial for a crispy crust. The warm scent filling your kitchen will be motivating!
- Bake the Bread: Gently place your loaf in the oven and bake for about an hour. You will start to smell the bread as it nears completion. If it appears too light after 40 minutes, add a few more minutes to ensure a golden brown top.
- Cool Before Slicing: Once baked, remove the bread and let it cool on a wire rack for at least 30 minutes. Allowing it to cool properly will ensure the inside sets correctly. Cutting too soon may result in a gummy texture.
Notes
- Storage Tips: Allow gluten free sourdough bread to cool completely before slicing. Store in an airtight container at room temperature for up to 3 days or in the fridge for up to a week.
- Expert Tips: Use a digital kitchen scale for accurate measurements to achieve consistent results. A Dutch oven is recommended for better baking outcomes. Ensure your sourdough starter is active and freshly fed before use to avoid rising issues. To address bread density, consider extending the rise time by an hour. For a crunchier crust, you may add steam to the oven while baking or increase the baking time slightly.
- Reheating Instructions: Reheat in a preheated oven at 350 degrees F for about 10 minutes or until warmed through.
- Serving Suggestions: Serve with butter and jam for breakfast. Pair with soups or salads for lunch. You can also make sandwiches using slices of this sourdough bread.
- Recipe Variations: Add nuts or seeds for texture and flavor. Incorporate herbs for a savory twist, or experiment with different flours in the blend for unique flavors.
- Ingredient Notes: When selecting the gluten free bread flour blend, ensure it is specifically designed for bread to get the right texture. If necessary, adjust the water in your dough based on the moisture absorption of different flour blends to ensure the proper dough consistency.
Nutrition
- Serving Size: 1 slice
- Calories: null
- Sugar: null
- Sodium: null
- Fat: null
- Saturated Fat: null
- Unsaturated Fat: null
- Trans Fat: null
- Carbohydrates: null
- Fiber: null
- Protein: null
- Cholesterol: null