
Making gluten free sourdough bread at home can feel like a bit of a challenge, especially with all the gluten-free restrictions some of us have. But trust me, once you get the hang of it, it’s so rewarding, and the flavor’s amazing!
This recipe solves dense crumb, crumbly texture, sticky dough, weak rise, and bland tang in gluten free sourdough with a starter method and simple steps.
I often struggled to find a bread that everyone in my family could enjoy. My mom and siblings need to eat gluten-free, and I want to make something that’s also friendly for my diabetes. This recipe solves that problem and brings everyone together around fresh bread.
This version not only works well, but it also cuts down the time spent second-guessing yourself. With a prep time of just 10 minutes and a total of a little over a day, you get that nutty, tangy taste we all love in sourdough. Plus, the heat-activated baking powder really helps with the rise, giving you a beautiful loaf.
If you want something deliciously sweet to go along with your bread, try making Nutella Swirl Banana Bread. It’s a great treat you can have while enjoying your gluten free sourdough bread!
Table of contents
Why You Will Love This Recipe
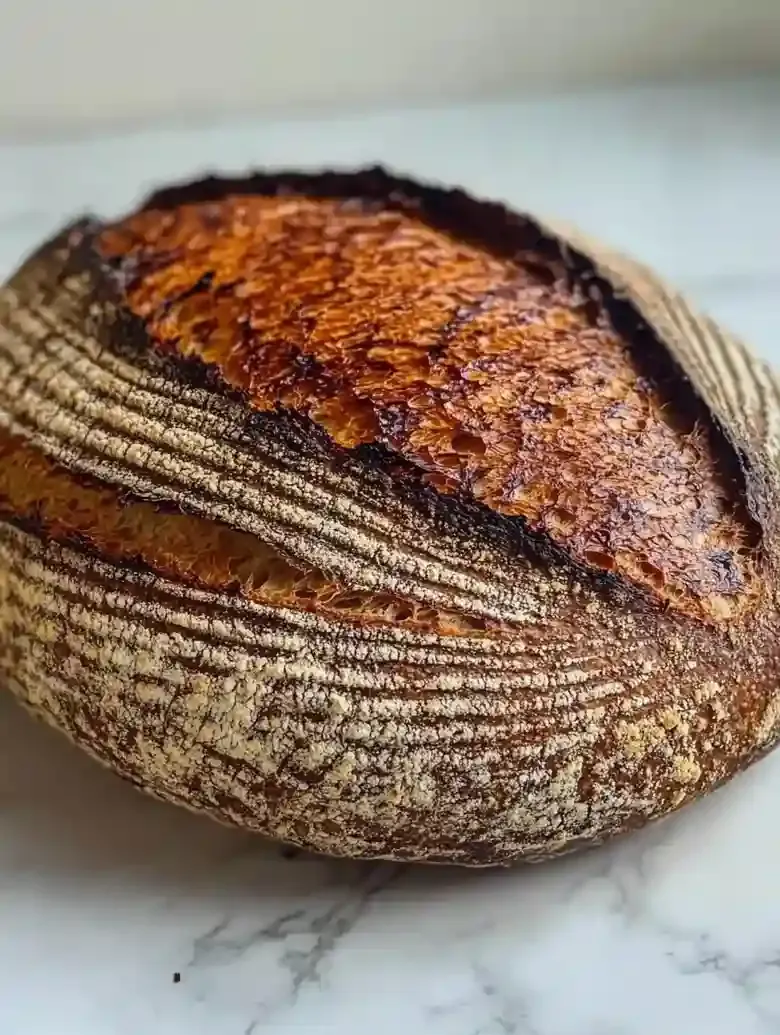
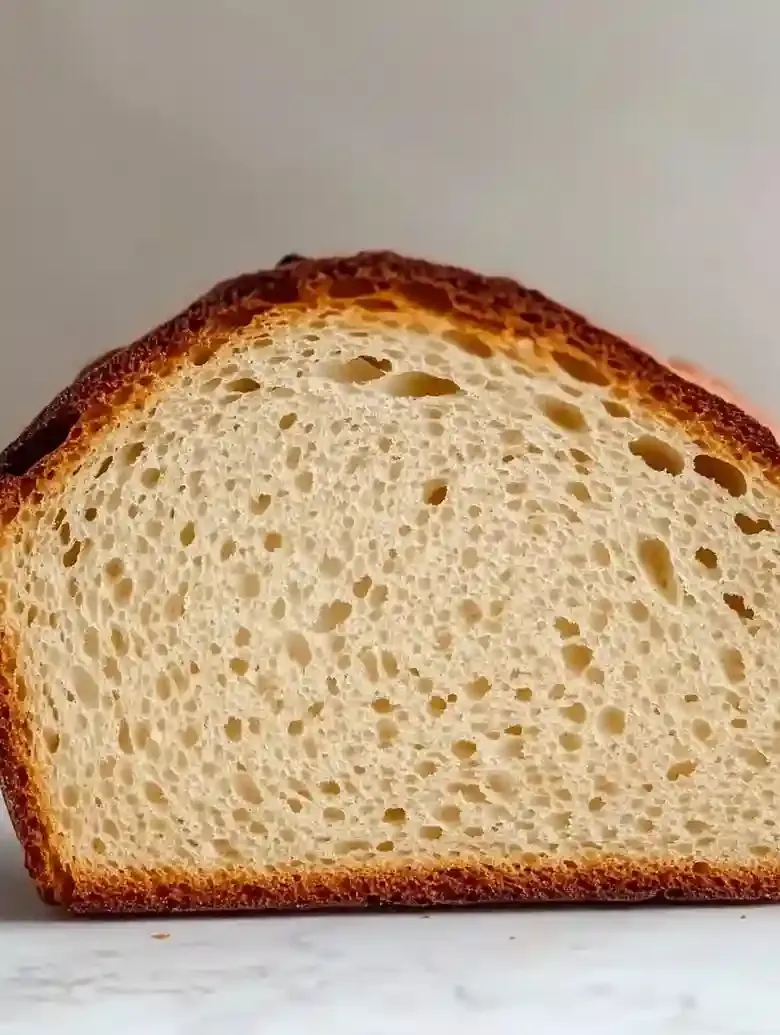
- Texture : This bread has a great chewy and crusty texture that you’ll love. It feels just like traditional sourdough, but it’s gluten-free.
- Flavor : With a tangy and slightly sweet taste, each slice brings a nutty richness that’s hard to resist. It makes every bite special.
- Convenience : The easy sourdough starter method means you won’t be guessing at any point. You can enjoy homemade bread without the stress.
- Storage : Once cooled, storing this bread is a breeze. It stays fresh for days at room temperature, or you can pop it in the fridge for even longer.
Easy Gluten Free Sourdough Bread
- Prep Time: 10 minutes
- Cool Time: 1 day 5 hours 10 minutes
- Cook Time: 1 hour
- Total Time: 1 day 5 hours 10 minutes
- Yield: 1 loaf 1x
- Category: bread
- Method: baking
- Cuisine: gluten free
- Diet: gluten free
Description
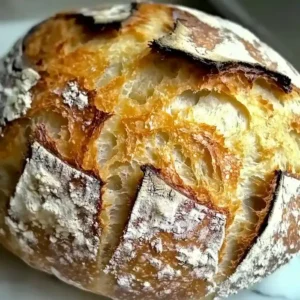
Best ever gluten free sourdough bread recipe that delivers a crispy crust and soft, airy texture, perfect for sandwiches or toast.
Ingredients
- 390 grams (13.8 oz) Kim’s gluten free bread flour blend, designed for bread
- 60 grams (2.1 oz) gluten free sourdough starter, mature and ripe
- 5 grams (0.2 oz) whole psyllium husks or 1.51/2 teaspoons psyllium husk powder, optional
- 6 grams (0.2 oz) kosher salt
- 10 grams (0.35 oz) heat-activated baking powder, optional
- 390 grams (13.8 oz) water, warm
- 26 grams (0.9 oz) olive oil
- 21 grams (0.74 oz) honey
- 1/4–1/21/2 teaspoon baking soda, optional
Instructions
- Mix the Dough: Start by mixing your gluten-free flour with the active sourdough starter, water, and salt until you achieve a well-combined, sticky dough that looks smooth and slightly tacky. If it feels too dry, you might need to add a splash more water.
- First Rise: Let the dough rise in a warm area for several hours, until it doubles in size and gets nice and puffy. You will notice a slight tangy aroma as it ferments. Be careful not to overproof, as this will affect the dough’s structure.
- Shape Your Loaf: Carefully scoop the airy dough onto a floured surface and gently shape it into a loaf. It should feel soft and elastic. Do not overwork the dough, as it could lose its airy quality. It is ready when it holds a nicely rounded shape without collapsing.
- Second Rise: Let the shaped loaf rise again for about an hour, covered with a cloth. You should see it getting bigger and puffier. If it appears flat after this time, it may need additional rising time.
- Preheat Your Oven: While the loaf is rising, preheat your oven to a high temperature. This step is crucial for a crispy crust. The warm scent filling your kitchen will be motivating!
- Bake the Bread: Gently place your loaf in the oven and bake for about an hour. You will start to smell the bread as it nears completion. If it appears too light after 40 minutes, add a few more minutes to ensure a golden brown top.
- Cool Before Slicing: Once baked, remove the bread and let it cool on a wire rack for at least 30 minutes. Allowing it to cool properly will ensure the inside sets correctly. Cutting too soon may result in a gummy texture.
Notes
- Storage Tips: Allow gluten free sourdough bread to cool completely before slicing. Store in an airtight container at room temperature for up to 3 days or in the fridge for up to a week.
- Expert Tips: Use a digital kitchen scale for accurate measurements to achieve consistent results. A Dutch oven is recommended for better baking outcomes. Ensure your sourdough starter is active and freshly fed before use to avoid rising issues. To address bread density, consider extending the rise time by an hour. For a crunchier crust, you may add steam to the oven while baking or increase the baking time slightly.
- Reheating Instructions: Reheat in a preheated oven at 350 degrees F for about 10 minutes or until warmed through.
- Serving Suggestions: Serve with butter and jam for breakfast. Pair with soups or salads for lunch. You can also make sandwiches using slices of this sourdough bread.
- Recipe Variations: Add nuts or seeds for texture and flavor. Incorporate herbs for a savory twist, or experiment with different flours in the blend for unique flavors.
- Ingredient Notes: When selecting the gluten free bread flour blend, ensure it is specifically designed for bread to get the right texture. If necessary, adjust the water in your dough based on the moisture absorption of different flour blends to ensure the proper dough consistency.
Nutrition
- Serving Size: 1 slice
- Calories: null
- Sugar: null
- Sodium: null
- Fat: null
- Saturated Fat: null
- Unsaturated Fat: null
- Trans Fat: null
- Carbohydrates: null
- Fiber: null
- Protein: null
- Cholesterol: null
Ingredient Notes
- Kim’s gluten free bread flour blend: This blend is key for getting the right texture. Look for one that’s designed for bread, as it’ll hold up better in this recipe.
- Gluten free sourdough starter: A mature and ripe starter gives your bread that tangy lift. Make sure it’s bubbly and ready to go, check the smell too!
- Psyllium husks (or powder): These add structure and chewiness to your bread. If you go for the powder, it mixes in easier. Both work, so pick what you have!
- Kosher salt: Even a little salt helps amplify all those great flavors. You can swap it out for sea salt if that’s what you have on hand.
- Heat-activated baking powder: This helps the bread rise, giving it that perfect lift. If you want a more natural approach, feel free to skip it!
- Water: Water is the foundation of your dough. Use warm water to help everything mix together well and activate your starter.
- Olive oil: It adds moisture and a hint of richness. You can also use another neutral oil if you prefer, just keep it light in flavor.
- Honey: This brings a touch of sweetness to balance out the tang. Maple syrup works in a pinch if you don’t have honey chilling in your pantry.
- Baking soda (optional): It can tweak the texture nicely, but it’s not necessary. If you want to skip it, just adjust your baking time a bit instead!
Recipe Tips
- If your sourdough isn’t rising as expected, check that your starter is well-fed and bubbly before using it.
- When the bread turns out too dense, try extending the rise time by an hour to allow for better aeration.
- For a crunchier crust, consider adding steam to your oven while baking or increase the baking time slightly.
- If you’re using a different flour blend, note that moisture absorption may vary, so adjust the water accordingly.
- When measuring ingredients, a digital kitchen scale is handy for precision to get consistent results every time.
Serving Suggestions
This gluten free sourdough bread works well with butter and jam at breakfast. It pairs nicely with soups, salads, or sandwiches for lunch.
You can use this bread to create toasted sandwiches or French toast. It also makes an excellent base for bread puddings or croutons.
Recipe variations
- You can use almond flour or oat flour as a substitute for Kim’s gluten free bread flour blend for a different texture and flavor.
- Add 2 teaspoons of garlic powder or 1 tablespoon of dried rosemary to introduce savory notes to your bread.
- Either walnuts or sunflower seeds can be included for extra crunch and nutrition, enhancing the overall bread experience.
- If you want to bake multiple loaves, simply double the quantities to yield enough for 2 loaves with 780 grams of flour and 780 grams of water.
Save This Recipe!
How to Store?
To keep your gluten free sourdough bread fresh, follow these storage tips:
Room Temperature: Place the bread in an airtight container at room temperature for up to 3 days. This method maintains texture.
Refrigeration: Store the bread in an airtight container in the fridge for up to 1 week. This extends its shelf life effectively.
Freezing: Wrap the bread in plastic wrap or aluminum foil, then place in a freezer bag. Freeze for up to 3 months. Thaw at room temperature for best results.
Other Recipes You’ll Love
- Mushroom Toast
- Caramelized Onion Grilled Cheese
- Raspberry Brie Focaccia
- French Onion Pull-Apart Bread
If you enjoyed this gluten free sourdough bread or any other recipe on my blog, please leave a ⭐ star rating and let me know how it went in the comments below. I appreciate taking time to read about this recipe, thank you!