
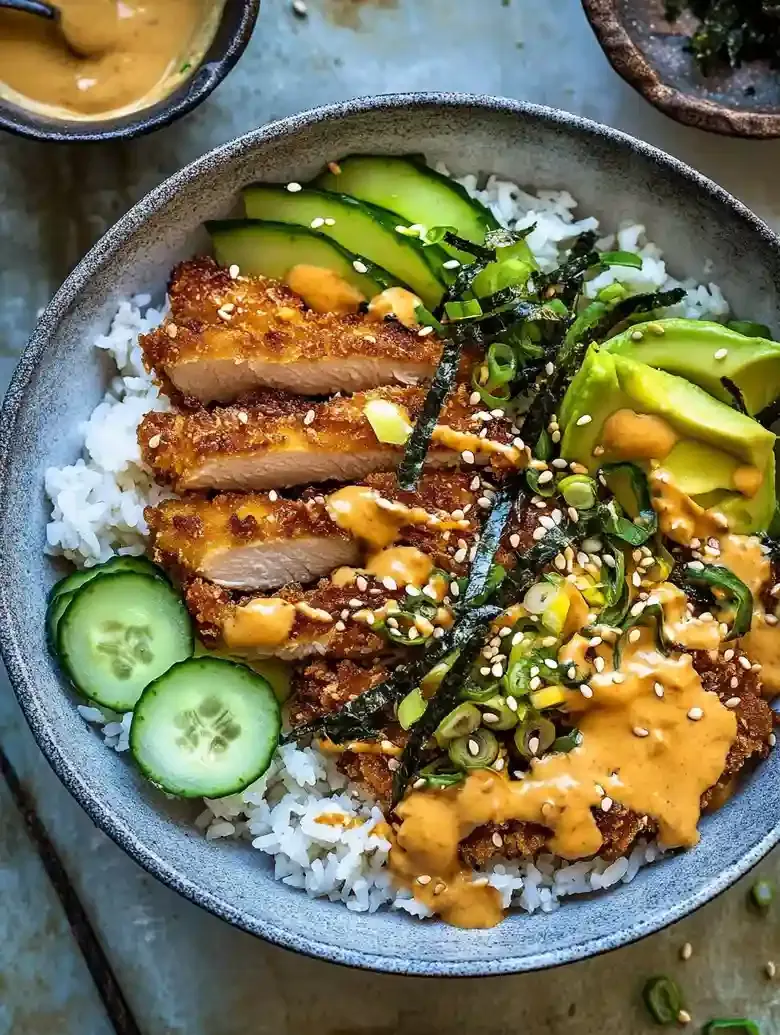
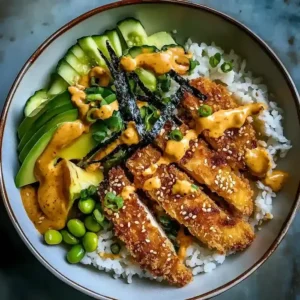
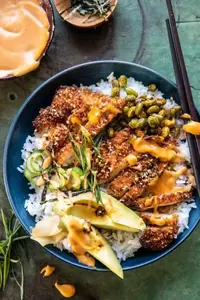
If you’re craving crispy chicken katsu bowls, you’re in for a treat! This dish layers crunchy chicken with warm rice, vibrant veggies, and zesty sauces, turning your meal into something deliciously fun.
This recipe resolves issues of dryness in chicken, achieves satisfying crunch, and offers ideas for customizable toppings and nutritious ingredients for a balanced meal.
Sometimes, the hardest part is getting that perfect crunch without the chicken being dry. I know that feeling all too well, especially on busy weeknights when dinner needs to be quick and appealing for my family. There are plenty of recipes that miss that crispy mark, but this one nails it every time!
This recipe works wonders in under an hour, making it a real winner when I want something satisfying without spending all day in the kitchen. It’s all about the right technique and a few tasty ingredients that make the chicken extra crispy while keeping it juicy inside. If you love comforting dishes, don’t miss my recipe for pizza sticks.
Table of contents
Dietary Considerations
- This recipe is not gluten-free due to the use of all-purpose flour and panko breadcrumbs in the breading process.
- The recipe contains eggs, so it is unsuitable for vegan diets that exclude all animal-derived ingredients.
- This recipe does not meet low-carb or keto diets because panko breadcrumbs and flour introduce significant carbohydrates.
- The recipe is dairy-free as it does not contain milk, cheese, or butter among the listed ingredients.
- The recipe is nut-free since none of the ingredients include nuts or nut-based products.
Why You Will Love This Recipe
- Crunchy Texture This dish features panko breadcrumbs that get wonderfully crunchy when fried. The contrast between the crispy chicken and tender rice makes each bite exciting.
- Bold Flavors With umami-packed soy sauce and a hint of sweetness from honey, the flavors in this meal are layered and vibrant. The spicy mayo adds a kick that rounds everything off nicely.
- Colorful Presentation The bright hues of cucumber, green onions, and avocado not only make your bowl look appealing but also add freshness to each bite. This dish is as pleasing to the eyes as it is to the palate.
- Make-Ahead Option You can marinate the chicken a day in advance for a quick dinner option. The rice and edamame can also be prepped ahead of time, making weeknight cooking simple.
How to Make Crispy Chicken Katsu Bowls
- Prep Time: 30 minutes
- Cool Time:
- Cook Time: 15 minutes
- Total Time: 45 minutes
- Yield: 4 servings 1x
- Category: Main Course
- Method: Pan-frying
- Cuisine: Japanese
- Diet: Low Lactose
Description
Crispy Chicken Katsu Bowls with marinated chicken, panko coating, and spicy mayo. Perfect for a delicious meal!
Ingredients
- 4 boneless, skinless chicken breasts or cutlets
- 1 cup (120 g) panko breadcrumbs, unseasoned
- 1 tablespoon (15 ml) toasted sesame oil
- 3–4 cups (570–760 g) cooked rice (jasmine or sushi rice recommended)
- 1 bag frozen shelled edamame (approx. 12 oz / 340 g)
- 1 cucumber, sliced
- 1 avocado, sliced
- Pickled ginger, for serving
- Nori sheets, sliced or torn, for garnish
- 2/3 cup (160 ml) tamari or soy sauce
- 1 tablespoon (15 ml) honey
- 2 teaspoons (8 g) grated fresh ginger
- 2 tablespoons (18 g) chopped green onions
- 1 teaspoon (3 g) toasted sesame seeds
- Chili flakes, to taste
- 1 large egg, beaten (room temperature)
- Vegetable oil, neutral flavor such as canola, for frying (enough to shallow fry; approx. 1/4 inch depth)
- 3 tablespoons (30 g) toasted sesame seeds (for breadcrumb coating)
- 1/3 cup (80 g) olive oil mayonnaise
- 1 to 2 tablespoons (15–30 ml) sriracha (adjust for desired heat)
- 2 teaspoons (10 ml) soy sauce or tamari
- 1 teaspoon (7 g) honey
Instructions
- Step 1: Prepare the Marinade: In a medium bowl, whisk together 2/3 cup tamari or soy sauce, 1 tablespoon toasted sesame oil, 1 tablespoon honey, 2 teaspoons grated ginger, 2 tablespoons chopped green onions, 1 teaspoon toasted sesame seeds, and chili flakes to taste. Ensure all ingredients blend completely to form the marinade.

- Step 2: Marinate the Chicken: Place the 4 chicken breasts or cutlets in a clean bowl. Pour 3 to 4 tablespoons of the marinade over the chicken, coating each piece thoroughly. Reserve the remaining marinade for serving. Refrigerate the chicken for 10 minutes while it soaks in the flavors.
- Step 3: Set Up Breading Station: In one shallow bowl, mix together 1 cup panko breadcrumbs and 3 tablespoons toasted sesame seeds. In another shallow bowl or plate, beat 1 large egg at room temperature. (Note: A light coating of flour is mentioned in the source content but not included in ingredient measurements; omit to maintain strict adherence.)
- Step 4: Heat the Oil: In a large skillet, pour neutral vegetable oil to about 1/4 inch depth and heat it over medium-high heat until shimmering and hot. Test the oil temperature by dropping a few panko crumbs into the pan — they should sizzle immediately, indicating it is at the correct heat.
- Step 5: Prepare the Chicken for Frying: Dredge each marinated chicken piece first in the beaten egg, ensuring full coverage. Then press the chicken firmly into the panko and sesame seed mixture, pressing lightly to ensure the coating adheres well.
- Step 6: Fry the Chicken: Carefully place the breaded chicken pieces into the hot oil. Fry each side for 3 to 4 minutes, until the coating turns deep golden brown and crisp. Use tongs to flip gently. Maintain the oil temperature at approximately 350°F (175°C) throughout frying to preserve crispness and prevent burning.
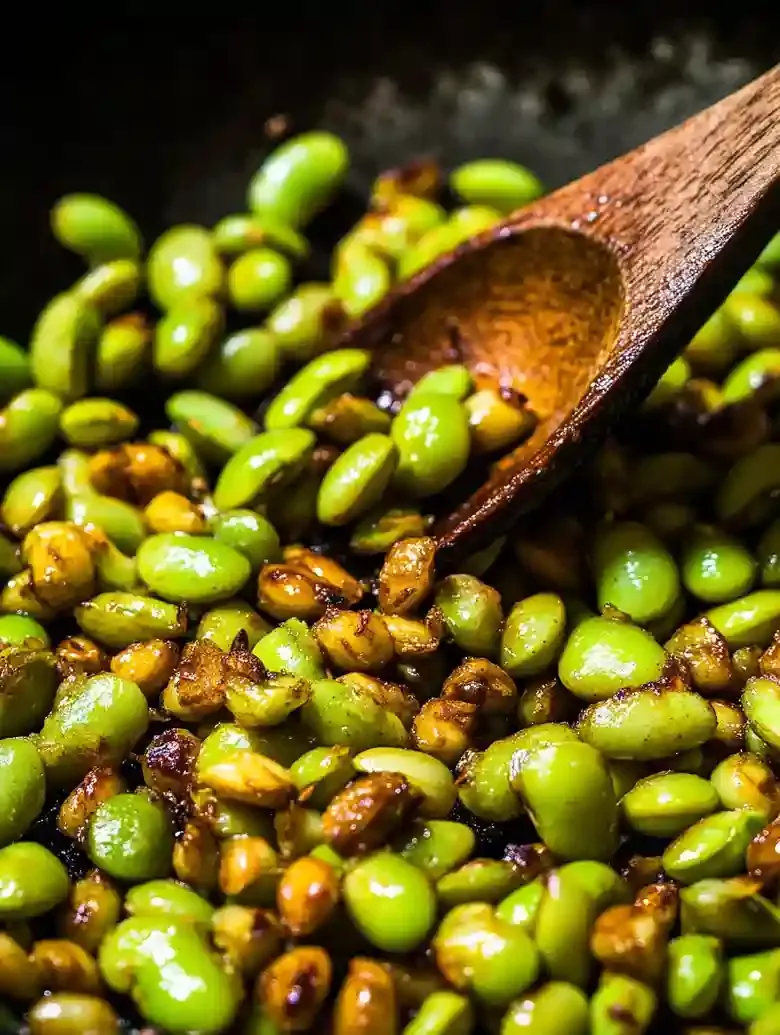
- Step 7: Cook the Edamame: After removing the chicken from the skillet and placing it on a cutting board, add the frozen shelled edamame to the remaining hot oil in the pan. Sauté briefly, allowing them to thaw and warm through for about 1 minute. Then add 2 tablespoons tamari or soy sauce and toss well. Remove from heat promptly.
- Step 8: Make Spicy Mayo: In a small bowl, combine 1/3 cup olive oil mayonnaise, 1 to 2 tablespoons sriracha (adjust for spice level), 2 teaspoons soy sauce or tamari, and 1 teaspoon honey. Whisk until smooth. Taste and adjust sriracha in 1/2 tablespoon increments if needed.
- Step 9: Assemble the Bowl: Slice the fried chicken breasts into strips. Place 3–4 cups cooked rice in serving bowls. Top with sliced chicken, cooked edamame, cucumber slices, avocado slices, pickled ginger, sliced green onions, and torn nori sheets. Drizzle with spicy mayo and reserved marinade sauce before serving.
Notes
- Room Temperature: Store assembled bowls in an airtight container at room temperature for up to 2 days to keep the chicken crisp and prevent moisture buildup.
- Refrigeration: Store components separately in airtight containers in the refrigerator for up to 4 days; keep chicken separate to maintain crispness.
- Freezing: Wrap chicken pieces tightly in plastic wrap, place in a freezer bag, and freeze for up to 2 months. Thaw overnight in the refrigerator before reheating.
- Keep oil temperature at about 350°F (175°C) during frying to achieve golden crispness without burning.
- Press panko mixture firmly onto chicken after egg dredging to ensure the coating adheres well.
- Adjust spicy mayo heat gradually by adding additional sriracha in 1/2 tablespoon increments to reach desired spice level.
- If the chicken coating does not stick well, press breadcrumbs firmly after dipping in egg before frying.
- For soggy chicken, ensure oil is sufficiently hot before frying; test with panko crumbs for quick sizzling.
- Overcooked rice can be avoided by measuring 1 cup water per 1/2 cup rice and cooking for about 15 minutes.
- Enhance flavor of edamame by adding the soy sauce or tamari during the last minute of sautéing.
- Serve with jasmine or sushi rice as a filling base.
- Side dishes such as steamed bok choy or simple cucumber salad complement the bowls.
- Use the fried chicken in katsu sandwiches or katsu curry for variation.
- Additional toppings such as more pickled ginger or toasted sesame seeds enhance flavor and texture.
- Use boneless, skinless chicken breasts for quicker cooking and easier breading.
- Choose unseasoned panko breadcrumbs for better control of flavor and a lighter crunch.
- Use a neutral oil like canola for frying to avoid overpowering the chicken flavor.
- Select fresh, vibrant green onions for garnish to add a mild onion flavor and color.
- This recipe is dairy-free and nut-free.
- Contains eggs and gluten (all-purpose flour and panko breadcrumbs), so it is not suitable for vegan or gluten-free diets.
- Not suitable for low-carb or keto diets due to breading carbohydrates.
Nutrition
- Serving Size: 1 bowl
- Calories: 350
- Sugar: 1 g
- Sodium: 600 mg
- Fat: 20 g
- Saturated Fat: 7 g
- Unsaturated Fat: 10 g
- Trans Fat: 0 g
- Carbohydrates: 15 g
- Fiber: 1 g
- Protein: 30 g
- Cholesterol: 90 mg
Ingredient Notes
- Chicken breasts: Go for boneless, skinless chicken breasts for quicker cooking and easier breading. Fresh chicken provides better flavor and texture compared to frozen.
- Panko breadcrumbs: This type offers an airy, crisp texture that gives katsu its signature crunch. Look for unseasoned panko for more control over flavor.
- Eggs: Use large eggs to bind the breadcrumbs to the chicken well. Make sure they’re at room temperature; this helps achieve even coating.
- All-purpose flour: A light coating of flour helps the egg and panko stick better. Choose a good quality brand for consistent results in texture.
- Vegetable oil: A neutral oil, like canola, is best for frying. This allows the chicken flavor to shine without overpowering it. Avoid oils with strong flavors.
- Sesame seeds: Toasted sesame seeds add a nutty flavor and a nice crunch. They also enhance the visual appeal of your dish, always worth it!
- Green onions: Thinly sliced for garnish, they add a fresh, oniony kick to your bowl. Choose vibrant green onions for the best flavor and texture.
- Ton katsu sauce: This sauce blends sweet and savory flavors, making it key for seasoning your chicken. Look for a brand with a balanced flavor profile.
Recipe Tips
- If your chicken isn’t crispy, ensure to keep the oil temperature at 350°F while frying, checking after 3-4 minutes on each side.
- When the panko doesn’t stick well, lightly press the coating onto the chicken cutlets after dredging; this helps it adhere properly before frying.
- If your spicy mayo isn’t spicy enough, adjust by gradually adding 1/2 tablespoon of Sriracha until the desired heat is achieved during mixing.
- For overcooked rice, consider cooking in 1 cup of water per 1/2 cup of rice, checking for doneness after 15 minutes.
- If the edamame lacks flavor, sprinkle 2 tablespoons of tamari/soy sauce 1 minute before removing from heat to enhance taste.
Serving Suggestions
Serve with jasmine rice or sushi rice for a filling meal. Add steamed bok choy or a simple cucumber salad on the side.
Use to make katsu sandwiches or katsu curry. Add to a rice bowl or vermicelli salad for variety.
Top with spicy mayo or a drizzle of sesame dressing. Include additional pickled ginger or a sprinkle of toasted sesame seeds for extra flavor.
Recipe variations
- You can use chicken thighs instead of boneless chicken breasts. Coat with 1 cup panko and 3 tablespoons sesame seeds for the crispy chicken katsu bowls’ crunch.
- Add 1 to 2 tablespoons sriracha and 1 teaspoon honey to 1/3 cup mayo for the spicy mayo. Adjust the heat to suit your taste preferences.
- Either frozen shelled edamame or fresh edamame work well. If using frozen, thaw them in the skillet, then add 2 tablespoons tamari for flavor.
- If serving more people, double the rice to 6-8 cups cooked and increase chicken cutlets to 8, keeping marinade and panko proportions the same for even coating. This joins my Street Corn Chicken Bowl in our meal rotations.
Save This Recipe!
How to Store?
To keep your crispy chicken katsu bowls fresh and delicious, follow these storage tips:
Room Temperature: Store in an airtight container at room temperature up to 2 days to maintain crispness and prevent moisture buildup on the chicken.
Refrigeration: Use an airtight container in the refrigerator for up to 4 days, keeping the chicken separate to retain its crispy texture.
Freezing: Wrap chicken pieces in plastic wrap and place in a freezer bag for up to 2 months. Thaw overnight in the refrigerator before reheating.
Other Recipes You’ll Love
- Toasted Coconut Marshmallows
- Puff Pastry Apple Rosettes
- Rhubarb and Strawberry Tart Recipe
- Chocolate Peanut Clusters
If you enjoyed this Crispy Chicken Katsu Bowls or any other recipe on my blog, please leave a ⭐ star rating and let me know how it went in the comments below. I appreciate taking time to read about this recipe, thank you!